Category: How to


I just installed Facebook Timeline feature in my profile and got engrossed in it awesomeness. A brilliant feature introduced to the world through the recent F8 Developers Conference, FB Timeline gives a beautiful portrayal of what you are and what you have been. And the timeline is neat and concise with a good mix of statuses, videos and pics, (and most importantly) at an amazing speed! The Timeline feature is the perfect example of gigabytes of per-user information put into good use. Now lets see how to activate it on your profile.

<guarantee>The steps below would hardly take 2 minutes to complete</guarantee>

Step 1 : Open https://developers.facebook.com/apps. This opens the developer page for you account. If you haven’t developed anything yet, it will ask for the “legendary” Request for Permission where we blindly issue an “Allow” irrespective of whatever it asks us to allow 😛

Step 2 : Now inside the developer’s page, you could find two obvious buttons to the top right namely “Edit App” and “Create New App”. Click on “Create New app” button.

Step 3 : A new message box appears where we are asked to enter an “App Display Name” and “App Namespace”. I entered it as “Narendran’s Chronicles” since my timeline is just gonna be my own history and the namespace as “narendranapps”. (Never Mind!)

Step 4 : You might have to enter your mobile number of credit card details to make yourself authentic to FB. I used my mobile number. After some 2-3 minutes, got a message saying “Facebook Mobile Confirmation Code: XXXX”. Enter this confirmation code into the textbox that appears on the screen and you are done with this authentication thing.

Step 5 : Now getting into the developer page once again, click on “Open Graph” on the Left bar. Under that choose “Get Started”.

Step 6 : You will get a page “Get Started with Open Graph” and it prompts “Start by defining one action and one object for you app”. I entered “read my timeline” at “profile”, since the timeline gets attached to my profile. Click the green “Get started” button.

Step 7 : The next page gives you options to edit the notifications which are displayed once someone reads your timeline. You can very well ignore this and click “Save Changes and Next”. Else if you are grammatically challenged like me 😛 you can have your own funny notifications.

Step 8 : Click “Save and Finish” in the next page.

Step 9 : Now you would be facing a page which gives you some alarmingly technical information and makes your mind-voice go WTF! But you could safely ignore this and open your FB profile as usual. You’l get a message which looks like this.

Message regarding Timeline feature


Step 10 : Click “Get it Now”. And yes, you’ve got it now!!

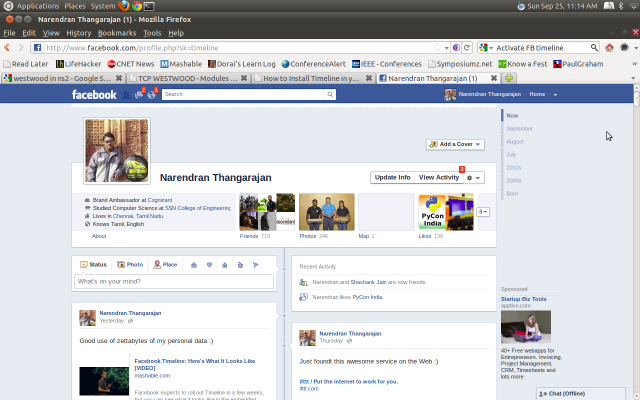
This is how your FB timeline looks!! 🙂

Cheers! 🙂

Note: This post was published in 2011 and the solution may not work anymore. And please note that we are improving only the DNS resolution part of the web page fetching process. This will not have any impact on your download speeds.

Nowadays I find interest in solving the real-life problems which people face everyday through technology (However trivial it may look, its gonna help someone 🙂 )

Are you one of those thousands of people who are not satisfied by the browsing speed they get with Tata Photon+ connection? Well here is the simplest tweak you could make and increase the browsing speed by a maximum of 300% and AM NOT JOKING!

If you are a geek, am sure you’d have figured it out already. But if you are a non-technically inclined person, this post is for you. The sloth-like speed of Tata Photon+ connection is due to the default DNS servers. So the tweak is setting your DNS to 8.8.4.4 and the alternate DNS to 8.8.8.8. These are Google’s Public DNS server addresses.

In Windows : 

This is for Windows 7. I believe everyone is current enough to have it on your PC 😛

Open Control Panel –> Network and Internet –> Network and Sharing Center –> Change Adapter Settings

Right Click on your Tata Photon+ Connection –> Properties

Move to Networking Tab

Double Click Internet Protocol Version 4

In the second fieldset, change to “Use the Following DNS server addresses”.

Preferred DNS server  : 8.8.4.4 and Alternate DNS server : 8.8.8.8

Click OK and Reconnect.

In Ubuntu : 

Click the Network Connections icon on the right hand side tray of Ubuntu Desktop.

Choose “Edit connections”

Change to “Mobile Broadband” –> Choose the Tata Photon+ Connection and click “Edit”

Then it might ask for your password. Enter it.

Change the Method to “Automatic (PPP) addresses only”

Set DNS servers to 8.8.4.4, 8.8.8.8

Click Save and Reconnect.

Note :  If you don’t find any improvement after the change, then may be Google Public DNS is not the one for you. It works best if you are in Chennai. Now, the thing is that Tata Photon’s default DNS servers are not that fast. So we need a better alternative. You can find them by using Namebench software.

My college, SSN College of Engineering provides “24×7” Wifi Connectivity. Ya thats true. But only “19×7” Internet Connectivity, since Internet connectivity is barred from 12 am to 5 am everyday. So I bought a Tata Photon+ Data Card with the Unlimited plan for Postpaid. It was of great help to me. In addition to the real “24×7” Internet access, it allowed me to access some useful websites like youtube, github, etc which are actually inaccessible through my college proxy. Moreover, I cannot access Android Market, TweetDeck or any other web application (save for the browser) in my Android phone through my college’s proxy. Now I had to find a way to get this Tata Photon+ Connection, which works on my laptop, on my Samsung Galaxy S2. So I had to share it wirelessly through my laptop’s Wifi Card, making it work like an access point. The procedure is damn simple.. Yet I made this post so mercilessly elaborate that you could rarely be misled by the procedure. So here we go –

WIRED CONNECTION -> SHARE THROUGH WIRELESS NETWORK :

Note : By wired connection I mean any connection you get through your physical ports, like Ethernet Cable, Mobile Broadband etc.

Step 1 : Get Connected to the Internet.

Check Internet connection

Step 2 : Switch on your Wifi Card. (So that you can see available wireless networks, if present)

Step 3 : Open Network Connections – First click the Network Connections icon on the top pane of Ubuntu desktop –> Click “Edit connections”. You must be facing a screen like this now.

Network Connections

Step 4 : Create Adhoc Network – Change to Wireless Tab –> Click Add –> Enter the details for the new connection.

Enter Adhoc network details

Step 5 : Change to IP4 Settings –> Set Method to “Shared to Other computers”.

Change Method to "Shared to Other Computers"

Step 6 : Connect to the newly created adhoc network – By clicking Network Connections icon –> Choose “Connect to Hidden Wireless Network” –> Choose the appropriate connection and connect.

Connect to the newly created adhoc network - naren-adhoc

Now all the surrounding systems will be able to access the adhoc network you created. By connecting to this now anyone can access the Internet, which was initially accessible only on your system.

Thus we have made our own laptop into an access point. Cheers! 🙂

Now to the funny part of the experiment – Though this was quite helpful, it did not solve the original problem. Ya, I couldn’t connect to this network using my Android phone (Gingerbread OS). 😀 The reason is that, Android Phones cannot detect Adhoc networks with their Stock ROMs. We need to root the phone and change the wap-supplicant file to enable that feature. More on that in another blog post.

WIRELESS CONNECTION -> SHARE THROUGH ETHERNET CABLE :

This is exactly the same as the previous one. The only change is that instead of changing the IP4 Settings in the Adhoc wireless network we created, do the same to the ethernet connection. Thats it. We are done.

Happily Everafter 🙂