My college, SSN College of Engineering provides “24×7” Wifi Connectivity. Ya thats true. But only “19×7” Internet Connectivity, since Internet connectivity is barred from 12 am to 5 am everyday. So I bought a Tata Photon+ Data Card with the Unlimited plan for Postpaid. It was of great help to me. In addition to the real “24×7” Internet access, it allowed me to access some useful websites like youtube, github, etc which are actually inaccessible through my college proxy. Moreover, I cannot access Android Market, TweetDeck or any other web application (save for the browser) in my Android phone through my college’s proxy. Now I had to find a way to get this Tata Photon+ Connection, which works on my laptop, on my Samsung Galaxy S2. So I had to share it wirelessly through my laptop’s Wifi Card, making it work like an access point. The procedure is damn simple.. Yet I made this post so mercilessly elaborate that you could rarely be misled by the procedure. So here we go –
WIRED CONNECTION -> SHARE THROUGH WIRELESS NETWORK :
Note : By wired connection I mean any connection you get through your physical ports, like Ethernet Cable, Mobile Broadband etc.
Step 1 : Get Connected to the Internet.
Step 2 : Switch on your Wifi Card. (So that you can see available wireless networks, if present)
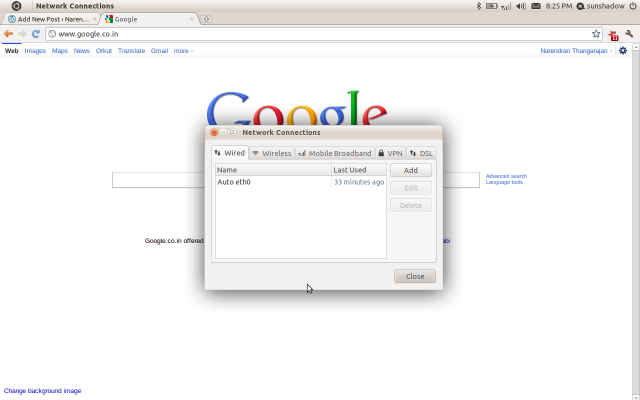
Step 3 : Open Network Connections – First click the Network Connections icon on the top pane of Ubuntu desktop –> Click “Edit connections”. You must be facing a screen like this now.
Step 4 : Create Adhoc Network – Change to Wireless Tab –> Click Add –> Enter the details for the new connection.
Step 5 : Change to IP4 Settings –> Set Method to “Shared to Other computers”.
Step 6 : Connect to the newly created adhoc network – By clicking Network Connections icon –> Choose “Connect to Hidden Wireless Network” –> Choose the appropriate connection and connect.
Now all the surrounding systems will be able to access the adhoc network you created. By connecting to this now anyone can access the Internet, which was initially accessible only on your system.
Thus we have made our own laptop into an access point. Cheers! 🙂
Now to the funny part of the experiment – Though this was quite helpful, it did not solve the original problem. Ya, I couldn’t connect to this network using my Android phone (Gingerbread OS). 😀 The reason is that, Android Phones cannot detect Adhoc networks with their Stock ROMs. We need to root the phone and change the wap-supplicant file to enable that feature. More on that in another blog post.
WIRELESS CONNECTION -> SHARE THROUGH ETHERNET CABLE :
This is exactly the same as the previous one. The only change is that instead of changing the IP4 Settings in the Adhoc wireless network we created, do the same to the ethernet connection. Thats it. We are done.
Happily Everafter 🙂


Thanks a million.. you’re the man..:)
thanks man